


Easy-Data Mediaplayer Online Help
Contact info: Support email: support@easy-data.no General email: webmaster@easy-data.no Support phone: +47 63 96 07 01
Produced and published by Easy-Data Kristen Tande. All rights reserved.
| support@easy-data.no | |
| Address | 2070 Råholt |
| Internet | http://www.Easy-Data.no/ |
This information is the best one available when published.
The manual are subject to changes continuously.
Råholt - Norway, 27. 12. 2010 - © Easy-Data Kristen Tande
Program and version information |
|
| Full name: | Easy-Data Mediaplayer |
| Version: | 1.2.0.68 |
| Size: | 12,67 MB |
| Release date: | 05.01.2011 |
| Prize: | Freeware |
| Downloads: | N/A |
Table of Content!
| Part 1. | Introduction |
| Part 2. | Install procedure |
| Part 3. | Prepare playback for all formats |
Part 4. |
The main window |
| Part 5. | The tools of Easy-Data Mediaplayer |
INTRODUCTION
Easy-Data Mediaplayer is a multimedia tool that besides beeing a video player also does a lot of multimedia related operations. This version is the first ever released and may contain some bugs in the start phase. The application is still under heavy developement and updates will be released within a short period of time. Below is the current help file for this product.
INSTALLATION
As of today there is only one option. A default installation, but there will be a standalone option that do not need installation.
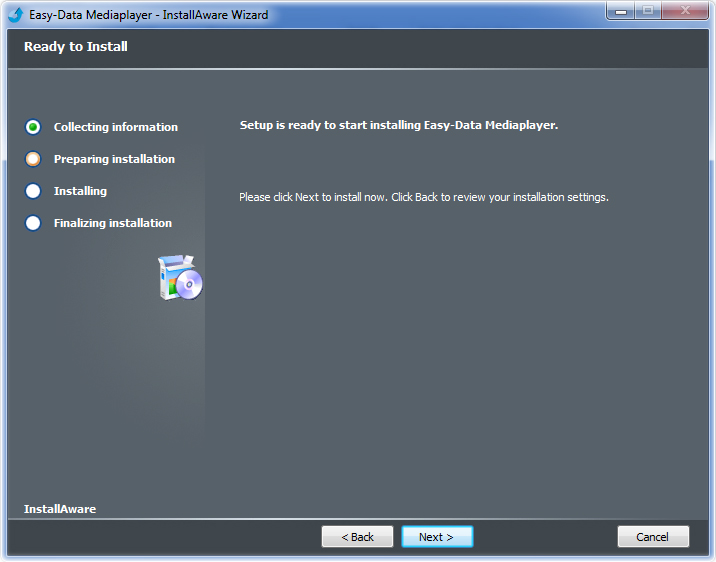
To install the Easy-Data Mediaplayer just doubleclick on the file edm_setup.exe and follow the instructions. Besides installing the core program and its files, the installer also install Microsoft Visual C++ runtime files. it contains files that the Easy-Data Mediaplayer needs to operate properly. If you do not install this, you may get the ActiveMovie window whenever you start a movie.
PREPARE VIDEO PLAYBACK FOR ALL FORMATS
Almost every movie player needs codecs to be able to play the different formats. Sure you have players like VLC with its own codecs inbuildt, but that may pretty fast get you into trouble. The reason for this is that you may end up with a lot of outdated codecs that have a poor performance. (Try to play a hd movie at fullscreen on a laptop with VLC and you get what im talking about.) And you will have to wait for a new version of the player before resolving the inbuildt codecs poor performance.
I have choosen to use the codecs that are installed into Windows and that is what most players do. In the jungle of codecs available you either have to be an expert to know what you will need, or do it the easy way. Download a codec pack or two. A codec pack is a collection of codecs, both audio and video and put together into a single installation program. I have tried most of the packs out there and have two favorites. The Shark Codec Pack and the K-Lite Mega Codec Pack. Both can be downloaded from the programs main menu.
The first pack, the Shark Codec Pack, is choosen reasoned the excellent userfriendly settings application that follows this package. Also that it is Windows 7 compatibe.
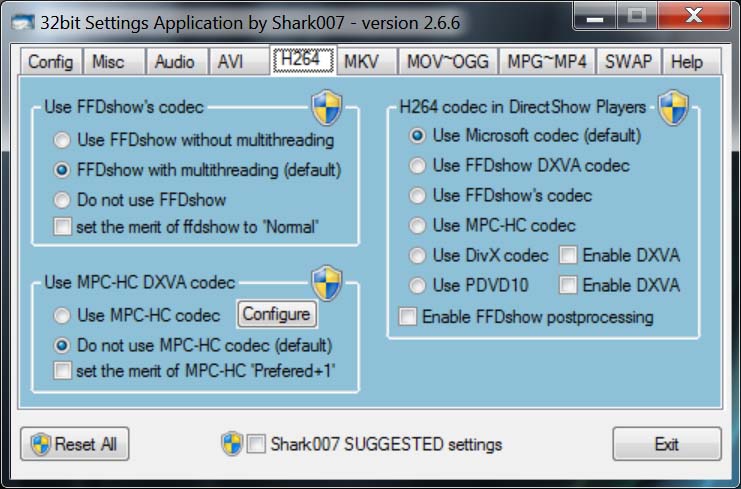
The Shark Codec Settings Tool
If you dont know anything about codecs and settings try using the Shark007 SUGGESTED settings (bottom of picture above). In most cases this let you play most formats without any hazzle. If you do watch movies alot i would suggest you take a little time reading and learning more about codecs and how they work. On our main site you will find good reading regarding this matter.
The second codec pack, The K-Lite Mega Pack, has a couple of really usefull codecs that you dont find in most other pacages. It is the Real Media, and Quicktime codecs needed to play .rm and .mov files. It also has most of the other codecs you will ever need. Besides, this pacage is recognised as one of the best.
So, after you have installed the Easy-Data Mediaplayer, the first thing to do is to download and install one (or both) of the above codec packs. If you already have installed codecs on your computer you may skip this step if all files plays properly. If not, uninstall the codecs you have installed, and install the new ones instead.
One last thing to do is to register the Easy-Data Mediaplayer as your default video player. This will make the playback of files a little more easy since you now have the option to just doubleclick on a video file to start it with this player. NB! You do not have to do this, its just a suggestion. You can always go back to have the previous player on your system to be the default one.
That is all you need to do. Now the player should work with almost every format out there.
THE MAIN WINDOW OF THE VIDEO PLAYER
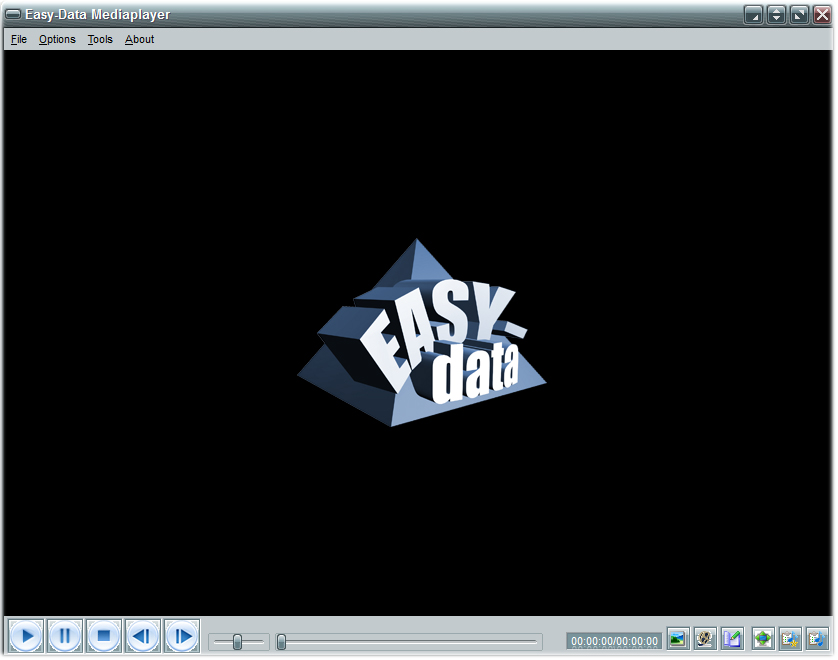
The main player window
In this part we will take a look at the main window and its options. Hint! If you move the mouse over a button, checkbox etc. you will get a short hint on what this object does.
Another thing to mention is some key features. You can
press: SPACE to pause and resume playback.
press: ESC to close player
press: ENTER to minimize and pause the movie. There are two settings for this shortcut. It is set in the Preferences menu.
PLAYING MOVIES
Easy-Data Mediaplayer has several ways of starting playback of a movie.
1. Use File Open from main menu.
2. Doubleclick on a movie (The player needs to be set as default player). To do this click the Register as default player under Options in main menu.
3. Drag and drop a file onto the player or the player icon. (bug fixed in version 1.0.0.34)
4. Add files directly to the playlist (The first file added will start playing automaticly)
5. If no previous files has been opened you can load a file by clicking the play button.
A little notice! This player can be started several times at once. This means that you could start playback of several movies at once. On my system i have runned 6 movies at once without any problems, but i will not promise it works on older computers.
PLAYING DVD MOVIES
Even if there is no direct DVD support in the player it still is capable of playback of DVD movies. It is a bit complicated, so for those of you who still want to try, this is the way:
1. First find the drive the dvd is located in exs: d:\ or e:\ etc.
2. On the dvd drive you will find two folders. AUDIO_TS and VIDEO_TS Open the Video_ts folder and list all files there.
Now, select the first *.vob file. Typically it looks something like this: VTS_01_1 .VOB, and often the first file has a size about 1 gb.
This file can be opened and watched in EDM. also all the forthcoming *.vob files in that folder. Think of it as a movie splitted into several bits.
What i use to do is to add all the *.vob files to my playlist, then its much easyer to watch the whole movie.
When you already reads this, i would like to say that DVD playback was originally buildt in the player, but i decided to remove this part of the player, reasoned other tools i have plans to add, and that may not be as compatible with the DVD par as it was. There will be a separate DVD player (and ripper/converter) released within april 2011.
PAUSE/RESUME/NEXT and PREVIOUS buttons
The Pause function is accessable from a couple of places. First the pause button as you can see from above picture. You also has the option to pause from within both the main menu and the popup menu (rightclick). In addition the SPACE button on your keyboard also function as pause. When you pause a movie the pause button become a resume button. So, first click on pause to pause playback. Then click on pause button again to resume playback (or SPACE).
The Next and Previous buttons will only work if you have a playlist loaded. Pressing Next will start next movie in the playlist and pressing Previous will start the previous movie in the playlist. Another way to play movies without using the Next or Previous buttons is to open the Playlist and doubleclick on the file you want to play from the list.
TOOLBARS/PLAYLIST and LIBRARY buttons
Looking at the lower right corner in the picture above you will see 6 buttons. From left to right they are:
1. Show Snapshot Toolbar
This is the simple way to quickly save an image from the movie you are watching.
2. Show Video Toolbar
In this toolbar you have several options regarding video. Fit video to screen, Set aspect ratio, zoom, adjust playback speed, inverse, flip or grayscale the video.
3. Show Bookmark Toolbar
This toolbar has only two buttons at this stage. Save Bookmark, and Load Bookmark. Lets say you are watching a movie, but have to quit before it is finished. Then what you can do is to create a bookmark before stopping the movie. And next time you have time to watch the movie just load the saved bookmark, and the player will load the movie where you left it.
4. Fullscreen On/Off
5. Show Playlist
6. Show Main Library
MAIN MENU and POPUP MENU
Most of the tools and options is available from both the main menu and the popup menu. Why so many options is doubled is that the main menu is removed when fullscreen is shown. But you may still need access to some parts of it and thats why you find them almost identical. Ther are a few options in the main menu that you dont need while fullscreen so those are only shown in normal mode.
To access the Popup meny just rightclick anywhere inside the players window.
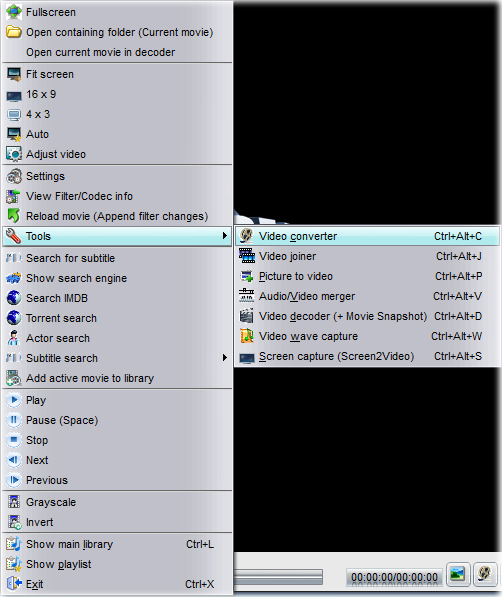
View of the popup menu
As you can see, most of the menu items are pretty self explaining. Yet there are a couple that needs explanation.
The menu item Open containing folder opens windows explorer at the current movies save location.
The Reload movie (Append filter changes) is made so you do not have to restart the whole applications whenever you do changes to a Filter (Direct Show) or codecs in the above tool View Filter/Codec info. Or in the Settings menu of the application.
THE TOOLS OF EASY-DATA MEDIA PLAYER
It is really the selection of tools that makes this mediaplayer preferable above the rest of the players out there. It is time to take a look at what you are able to do with this software.
THE VIDEO JOINER
This tool does exactly what is says. It joins several video files into one single file. There is not much to say about this tool, its all pretty self explaining. Add the files you want, then select output options. Finally press the start button. Thats it! Remember that you do not need to add only one input format. It is no problem to load one .avi and one .rm and one .mpg file in the same process. The joiner will convert it to the right output format anyway.
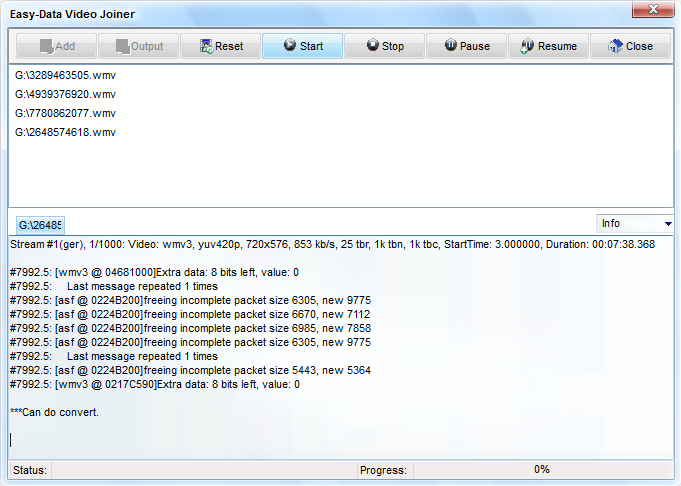
The default output settings will give you a very good quality. But remember Quality costs. Not money, but time. Depending on video sizes and format the progress can take quite a while to finish. Anyway, start the joining, and watch a movie in the main window while you wait. All our tools can be used simultaneously.
THE CONVERTER
This is the tool for convertions of files. It can load 20 movies at one session, and all of them can be any available format in and out. There are some default settings you should be aware of before you start. The thread mode. If you want to be able to pause any convertions the Thread mode must be activated. You cannot pause a convertion that dont use threads. A suggested setting is to use threads, set thread count to 5, and thread priority to Normal.
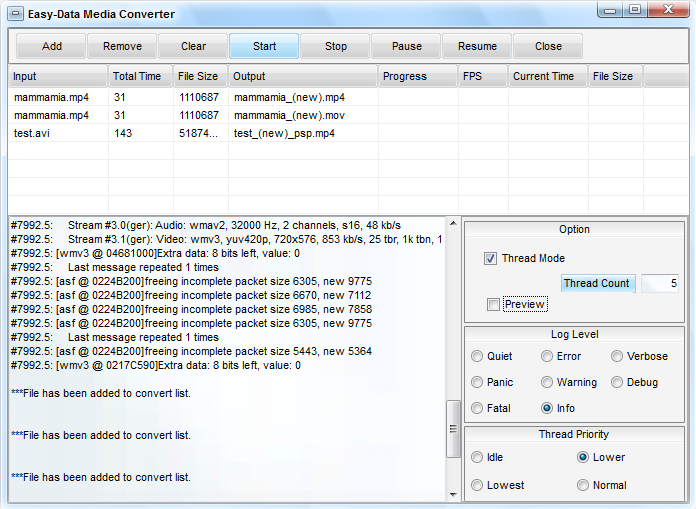
The main converter page.
The log level settings is default set to Info. I suggest you leave it like that if you dont have a special need for one of the other options. Like the Joiner the conversion of files may take pretty long time depending on file size and format. And again. You can still watch a video while the converter works.
THE PICTURES TO VIDEO TOOL
As it is today, this tool is just for fun. I would not use this to try to create a proffessional video. I am working on a much better version that will create aproffessional result and with loads of new options. Anyway, try it out! (Bug fix in version 1.0.0.34. You can now multiselect pictures)
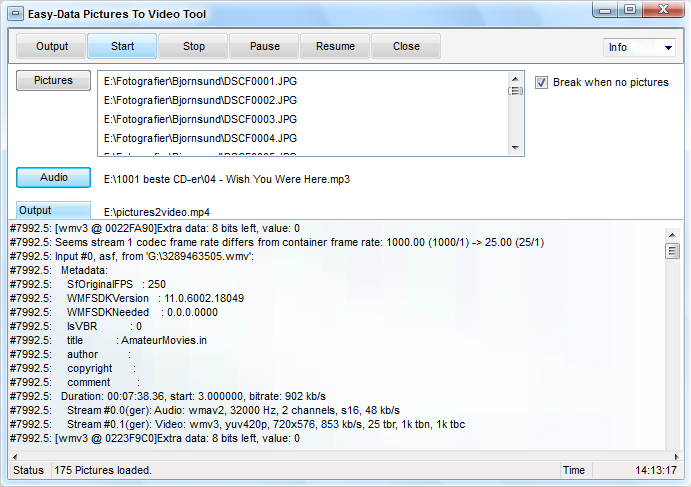
The Picture To Video main window
It is easy to use though. First add the pictures you want by clicking on the Pictures button. Next select a audio file with the Audio button. Now, select output options by clicking the Output button, and finally click the Start button. The result file is mp4 format and cannot be changed in this version.
THE VIDEO DECODER
This is a nice tool if you want to closely inspect a video file. It lets you step frame by frame forwards or backwards. Also Keyframe steps are possible. Besides this it also has a cool function called Snapshots. If you click on the Snapshot button the application will divide the total lenght of the movie with 16. Then create an image for each of those 16 steps. Finally it combines all images into one single file where the selected pictures are shown as large thumbnails. (Change in version 1.0.0.34. Added two buttons to 10 frames step forward and backward. Done by user request.)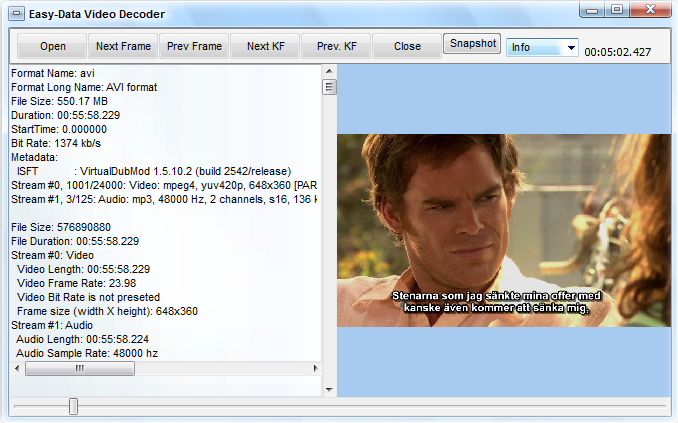
The Video Decoder at work
You will get the option to set the size of the final image in the Thumb view thats show when image is created.
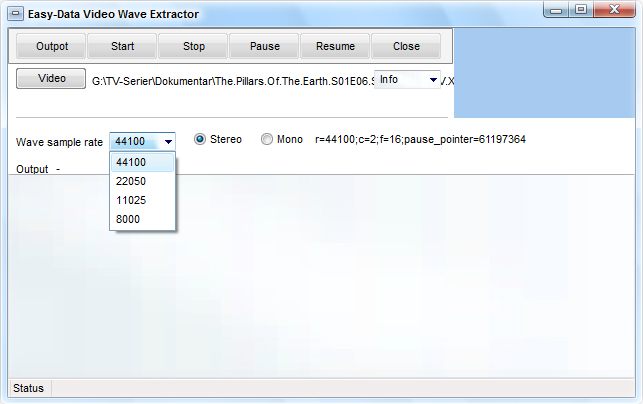
THE VIDEO WAVE TOOL
This is a tool for extraction of audio from a movie. As the other tools its quite simple in use. Select video file with the Video button. Select output options regarding sound. Sample rate, Stereo/Mono. Then click on the Output button to select save name of the finished audio file, and click Start. Thats It!
THE AUDIO VIDEO MERGER
This tool works oposit of the tool above. Instead of extracting audio it mixes an audio file with an video file. Start with the selection of video file and audio file, Select output options then click the start button.
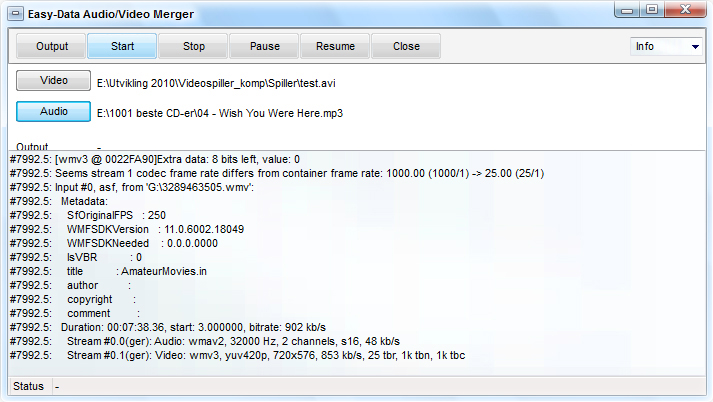
This tool has only one output option as it is today. Mp4 format. Dont worry. There will be added options to save at any format you want pretty soon.
THE SCREEN TO VIDEO TOOL
Ever wanted to create a movie of your computer screen?, Or record a part of the screen? Well, now you can do this.
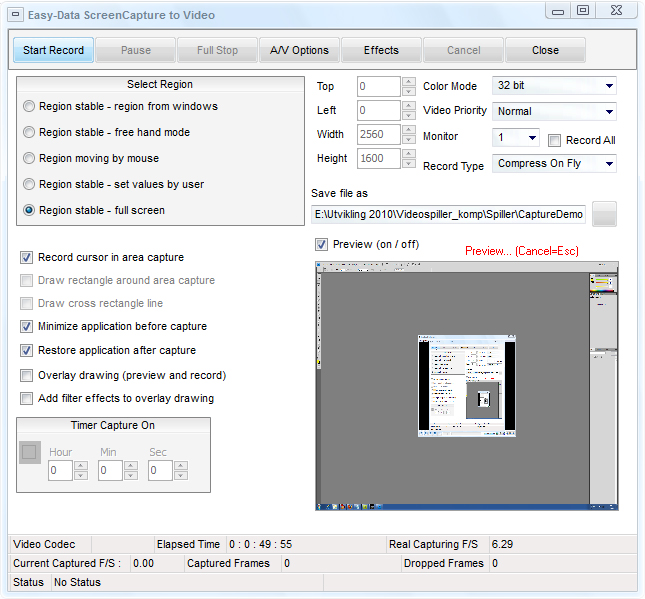
The Screencapture main window
To be continued......